
Threaded Insert Installation Production Tool
Production Installation Tools for Tap-Lok thread-cutting inserts and Speedserts thread-forming inserts feature hardened studs for twisting the threaded insert into the base material. They also feature a release mechanism for easy removal of the tool once the threaded insert is locked into the base.
| Drill Press Installation – Production Tool 3 Easy Steps: 1. Bring end of nose piece tightly against surface of material. Hold in position. |
 |
What are Threaded Inserts?
Groov-Pin Threaded Inserts are cylindrical, metal bushings with features on the outside which lock them into a plastic or metal base material to anchor your fasteners. Our Threaded Inserts provide high-quality, permanent, wear-resistant internal threads and are designed to be installed in molded or drilled holes in one simple step. While each style performs in a range of materials, they are generally classified by method of installation: Thread-Cutting, Thread-Forming, Push-In, or Ultrasound.
Why do I need a Threaded Insert?
Threaded Inserts are designed to improve the strength of assemblies by distributing forces from the fastener over a large area in the base material, thus increasing the load-bearing capability. For metals such as aluminum, this means full utilization of high-tensile-strength fasteners. In plastics, Threaded Inserts avoid wear and cold-flow problems encountered with thread-forming screws. Threaded Inserts offer both engineering and cost economies.
Why choose Threaded Inserts over wire coil inserts?
Strong and Reliable
- Tap-Lok®s provide 1.5x higher pullout resistance
- Tap-Lok®s provide a pullout resistance 2x that of a tapped hole
- Our threads are permanent and still meet specifications from the factory through numerous screw removal/insertions
- Improve assembly strength
- Increase load-bearing capabilities
- High-quality, permanent, wear-resistant
Easy to Install
- One step installation vs. 3 steps for wire coils
- Cut down labor costs
- No special tools are required for installation
- Threaded Inserts install first time, every time
- No tangs to break off and remove
Broad Product Line
- Threaded Inserts for different installation methods: Self-tapping, Ultrasonic, Press-in, Molded-in
- Threaded Inserts for metals, hard and soft plastics, and wood
- Threaded Inserts made of steel, stainless steel, and brass
- Variety of finishes and protective coatings available
How do they work?
Since Threaded Inserts are generally classified by method of installation, each type of insert has its own unique function. Here is a breakdown of how each type works:
 |
Tap-Lok® Hole Series
Circular cutting elements self-tap and lock into the base material. |
 |
Tap-Lok® Coarse Series
Cutting slots are self-tapping and self-locking for quick, easy installation and excellent resistance to vibration. |
 |
Tap-Lok® Slotted Series
Cutting slots are designed to quickly tap into the base material and lock the threaded insert in place. |
 |
Tap-Lok® Wood Series
Thread-cutting threaded inserts designed for use in hard and soft woods as well as wood composites. |
 |
Speedserts®
Exterior lobes are designed to roll through the base material and lock the insert in place without leaving chips behind. The wave gently rolls through the base material pushing it back and then allowing it to return behind the wave crest to securely lock the insert in place. |
 |
Barb-Sert®
Barbs displace and capture plastic base material during installation to firmly lock the insert in place. |
Advantages

Performance

Installation
| Installation tools for Tap-lok® thread-cutting Threaded Inserts and Speedserts® thread-forming Threaded Inserts feature hardened studs for twisting the threaded insert into the base material and a release mechanism for easy removal of the tool once the insert is locked into the base material.
For installation, the insert is twisted onto the tool stud and into contact with the tool nose piece. The tool is then used to twist the Threaded Insert into the base material. To remove the tool from the insert, the insert must be released. Production tools automatically release the insert when torque on the tool is reversed. Hand tools must be released manually. Field Installation:
Drill Press Installation – Production Tool 3 Easy Steps:1. Bring end of nose piece tightly against surface of material. Hold in position.
After set-up is complete, hold the insert so that the rotating tool drive stud will thread into it. Hold the insert by the outer thread until it is snug against the nose piece. Maintain the speed of the installation stud to between 100 and |
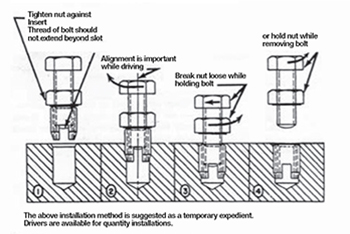
Hand Tool Installation To Install:1. Install hand tool in a holding device such as a drill press chuck or hand-tapping fixture to assure perpendicular alignment with work.
2. Screw insert on stud until it contacts nut.
It is important that the installation tool is squarely aligned with the work surface. Field repairs can be made by using the hand tool in conjunction with either a carpenter’s brace or a speed wrench. Watch it in Action! Hand Tool Installation Demonstration:
Production Tool Installation Demonstration:
Threaded Insert Installation demonstrations of self-tapping inserts using Flex Arm tapping unit Flexibly install in one step.
|


Installation Tools for Thread-Cutting and Thread-Forming Inserts
| Inch Sizes | Metric Sizes | ||||
| Internal Threads | Production Tool Number | Hand Tool Number | Internal Threads | Production Tool Number | Hand Tool Number |
| 2-56 | PT0256 | HT0256 | M2 X 0.4 | PTM0204 | HTM0204 |
| 4-40 | PT0440 | HT0440 | M3 X 0.5 | PTM0305 | HTM0305 |
| 6-32 | PT0632 | HT0632 | M3.5 X 0.6 | PTM0306 | HTM0306 |
| 8-32 | PT0832 | HT0832 | M4 X 0.7 | PTM0407 | HTM0407 |
| 10-24 | PT1024 | HT1024 | M5 X 0.8 | PTM0508 | HTM0508 |
| 10-32 | PT1032 | HT1032 | – | – | – |
| 1/4-20 | PT2520 | HT2520 | M6 X 1.0 | PTM0610 | HTM0610 |
| 1/4-28 | PT2528 | HT2528 | – | – | – |
| 5/16-18 | PT3118 | HT3118 | M8 X 1.25 | PTM0812 | HTM0812 |
| 5/16-24 | PT3124 | HT3124 | – | – | – |
| 3/8-16 | PT3716 | HT3716 | M10 X 1.5 | PTM1015 | HTM1015 |
| 3/8-24 | PT3724 | HT3724 | – | – | – |
| 7/16-14 | PT4314 | HT4314 | – | – | – |
| 7/16-20 | PT4320 | HT4320 | – | – | – |
| 1/2-13 | PT5013 | HT5013 | M12 X 1.75 | PTM1217 | HTM1217 |
| 1/2-20 | PT5020 | HT5020 | – | – | – |
| 9/16-12 | PT5612 | HT5612 | M14 X 2.0 | PTM1420 | HTM1420 |
| 9/16-18 | PT5618 | HT5618 | – | – | – |
| 5/8-11 | PT6211 | HT6211 | M16 X 2.0 | PTM1620 | HTM1620 |
| 5/8-18 | PT6218 | HT6218 | – | – | – |
| 3/4-10 | PT7510 | HT7510 | M18 X 2.0 | PTM1820 | HTM1820 |
| 3/4-16 | PT7516 | HT7516 | – | – | – |
Important Notes
| 1. High-volume users are advised to order replacement studs when placing insert order. |
| 2. Special tools are available for installing threaded inserts into deep recesses and close to obstructions. |
| For further information, contact Customer Service |
To Order Production or Hand Tools:
Specify the tool number for the internal thread size of the thread-cutting or thread-forming insert desired.
To Order Replacement Parts:
Replacement studs and now pieces can be ordered for production tools. Specify the production tool number with a suffix:
Stud = ST
Nose Piece = NP
Example: Replacement nose piece for production tool for 8-32 insert would be specified by PT0832-NP.
Resources
| We have provided easy one click downloads for design engineering purposes. To view all of our available CAD files, see our Knowledge Base. | Download the free e Drawings software from SolidWorks to view CAD files.
|
Speedserts® CAD Files
Barb-Sert® CAD Files
Tap-Lok® Slotted Series CAD Files
Tap-Lok® Wood Series CAD Files
| Wood 4-40 | Wood 10-32 |
| Wood 6-32 | Wood .250-20 |
| Wood 8-32 | Wood .312-18 |
| Wood 10-24 | Wood .375-16 |